Magento PWA
Introduction
Our Magento PWA plug-in comes with regular updates and full integration support, offering a versatile out-of-the-box solution to accept online payments easily:
- Hosted Checkout Page: Redirect your customers to the PAYONE E-Payment to with any of our available payment methods.
- Hosted Tokenization Page: Include an iFrame in your checkout page for card payments.
- Offers the following payment methods on our platform:
American Express
Diners Club
iDEAL
Klarna
Maestro
MasterCard
PayPal
Visa
Progressive Web Applications (PWA) and globally headless storefronts are the future of eCommerce. Decoupling your front end and back end offers you these features:
- Dynamic input linking: Our API links with your back end dynamically depending on your customers’ front end input. This will ease increasing your leads and converting prospects into sales.
- Efficient store management: Make independent changes in your front/back end without interfering with your everyday business operations.
- Manage external services: Use dedicated tools for SEO, CIAM, CMS or any background service to optimise your business.
- Fasten process: PWA processes all services simultaneously and independently, allowing your system to use them with optimal resource allocation. PWA hence supports endless horizontal scaling.
- Stick to familiar technology: PWA utilises the same API as Adobe Commerce for the back end.
- Front end customisation: Design your front end appearance independently from the set up of the back end.
On top of that, the PWA plugin offers you more advantages:
- Mobile first experience: Focus mainly (but not only!) on mobile experience.
- Reconcile storefront/services: Easily integrate an independent storefront connected to all the services you need.
A headless storefront distinguishes a website front end from its back end
- Front end: The interface for your customers for browsing through your catalogue, add items to their basket or perform any actions your shop allows.
- Back end: All the systems, processes and tools to manage your customers’ requests and to make your business runs smoothly. Concealed for your customers, you use it to manage your catalogue, initiate marketing campaigns, orders, store data etc.
Keep an eye on our Release Notes to stay informed about updates and new features (i.e. payment methods, features, integration modes) we have added to this plugin!
Check out our documentation to learn how to link your store with our platform to profit from all these features!
Download pluginGitHub repository
Create account
To process transactions with this plugin, you need an account on our platform.
This plugin works with both our test and live environment. A test account is a great way to get familiar with both the plugin and our platform. Once you want to go live, create a production account or contact us!
Install plugin
The first step to use the plugin is the installation process. Before you proceed, make sure your infrastructure meets these system requirements:
| Item | Description |
|---|---|
| Plugin package | |
| PAYONE E-Payment credentials |
|
| Magento |
Compatible with Magento 2.4.5 Find an extensive overview about the compatibilities on the Magento support site. |
| PHP |
PHP version 8.1 |
| PCI compliancy |
SAQ A |
Once done, choose one of these installation modes and follow the respective steps:
Before you start the actual installation, make sure to install Magento PWA Studio in your environment. For detailed information, read the dedicated developer guide.
Installation from Archive
- Go to your project source directory
cd your_project/src - Create new namespace folder for the module:
$ mkdir @worldline - Extract and copy archive contents into the new namespace folder ("@worldline")
- Run following commands to register the module (development environment):
$ yarn add link:src/@worldline/worldline-payment
Or following command for production environment:
$ yarn add file:src/@worldline/worldline-payment - Register the extension as a trusted vendor in your project configuration by adding following code into "your_project/package.json" file:
{
	"pwa-studio": {
		"targets": {
			"intercept": "./local-intercept.js"
		},
		"trusted-vendors": [
			"@worldline"
		]
	}
}
Extension uses some project-level API which require specific access on the code level, so it is mandatory to add extension as a trusted vendor. Some functionality may be broken without adding trusted vendor record.
- Run the Watch command:
$ yarn watch
Install from GitHub
Installation from GitHub is almost the same as from the archive, but skips a few steps:
- Go to your project source directory
$ cd your_project/src - Execute the following command:
$ yarn add
git+https://USERNAME:TOKEN@github.com/Ingenico/direct-magento-pwa.git#master
Replace USERNAME with your GitHub username and token with your GitHub personal access token. For information about creating your GitHub access token, read the dedicated Github guide. - Register the extension as a trusted vendor in your project configuration by adding following code into "your_project/package.json" file:
{
	"pwa-studio": {
		"targets": {
			"intercept": "./local-intercept.js"
		},
		"trusted-vendors": [
			"@worldline"
		]
	}
}
Extension uses some project-level API which require specific access on the code level, so it is mandatory to add extension as a trusted vendor. Some functionality may be broken without adding trusted vendor record.
- Run the Watch command:
$ yarn watch
Configure plugin
After the installation, you need to configure the plugin to link your store to our platform.
Configure connection
- Login to the Adobe commerce/Magento Back Office. Go to Stores > WORLDLINE ONLINE PAYMENTS > Connection.
- In Connection, configure the following settings:
Property Description/Actions Environment mode Select between "Test" or "Production" to link your shop to the respective environment. Depending on your selection, the shop module will send the transaction requests to the test or production environment.
Make sure to:
- Not to mix up credential from "Test" with Production" and vice versa when configuring fields Merchant ID (PSPID)/API Key/API Secret and webhooks credentials.
- To switch to "Production" as soon as you have finalised your tests.
API Key Enter the API Key of your test or live PSPID. Read our dedicated guide to learn how to generate one.
API Secret Enter the API Secret of your test or live PSPID. Read our dedicated guide to learn how to generate one.
Merchant ID (PSPID) Enter your PSPID from our platform that you want to use for transaction processing.
For some properties, Magento allows you to use the default value defined on the system level. If you want to do this, flag “Use system value” accordingly.
- Click on "Save Config" to confirm your configuration.
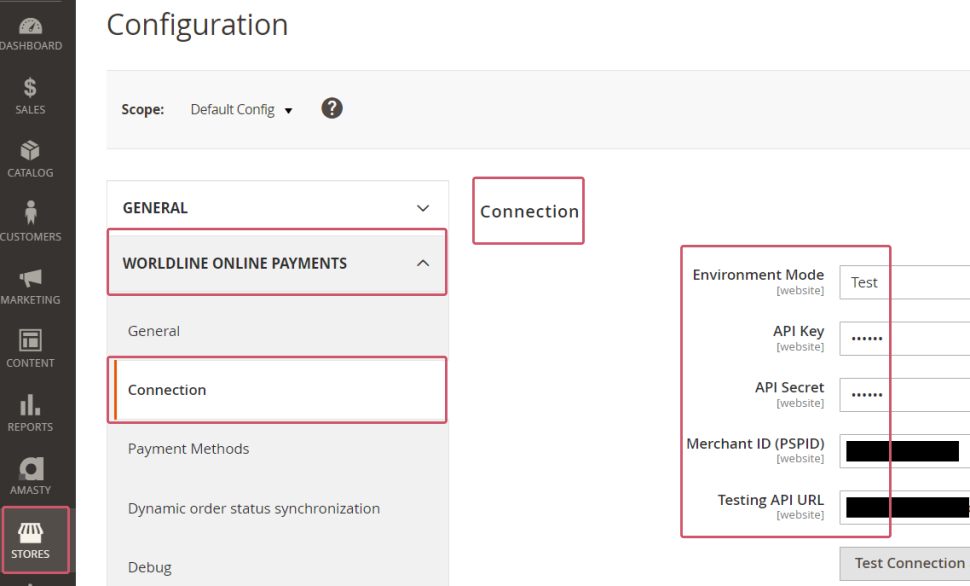
Once you have filled in the table, verify the configuration by establishing a test connection between the plugin and our platform. Click on the "Test Connection" button. Check that the button text changes to "Successful! Test again". If the button text changes to "Connection failed! Test again?", contact your system administrator for troubleshooting to check:
- You are using the correct credentials
- Whether your PSPID is active
- You send the request to the correct PSPID/environment (Test vs Production)
Configure webhooks
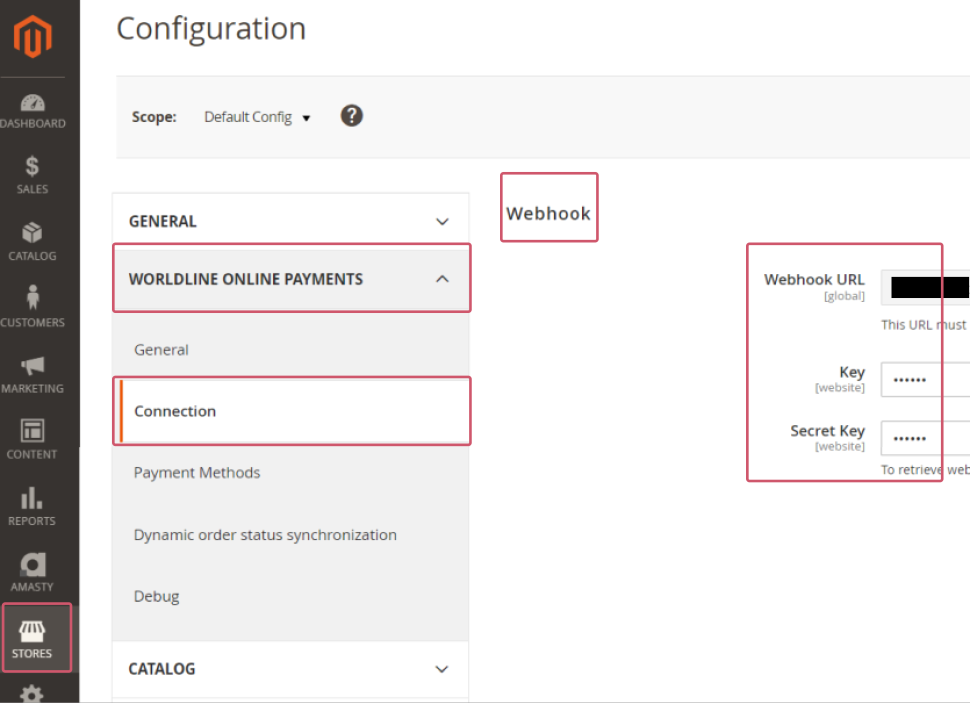
- Login to the Adobe commerce/Magento Back Office. Go to Stores > WORLDLINE ONLINE PAYMENTS > Connection.
- In Webhooks, configure the following settings:
Property Description/Actions Allow Receiving Webhooks Select "Yes" to receive webhooks in the Magento server. Webhook URL Copy this URL into the Endpoint URLs fields in the PAYONE E-Payment Merchant Portal as described in our dedicated guide. Key Enter the API key of your test or live PSPID. Read our dedicated guide to learn how to generate one. Secret Key Enter the API secret of your test or live PSPID. Read our dedicated guide to learn how to generate one.
For some properties, Magento allows you to use the default value defined on the system level. If you want to do this, flag "Use system value" accordingly.
- Click on "Save Config" to confirm and clean your cache.
Configure payment methods
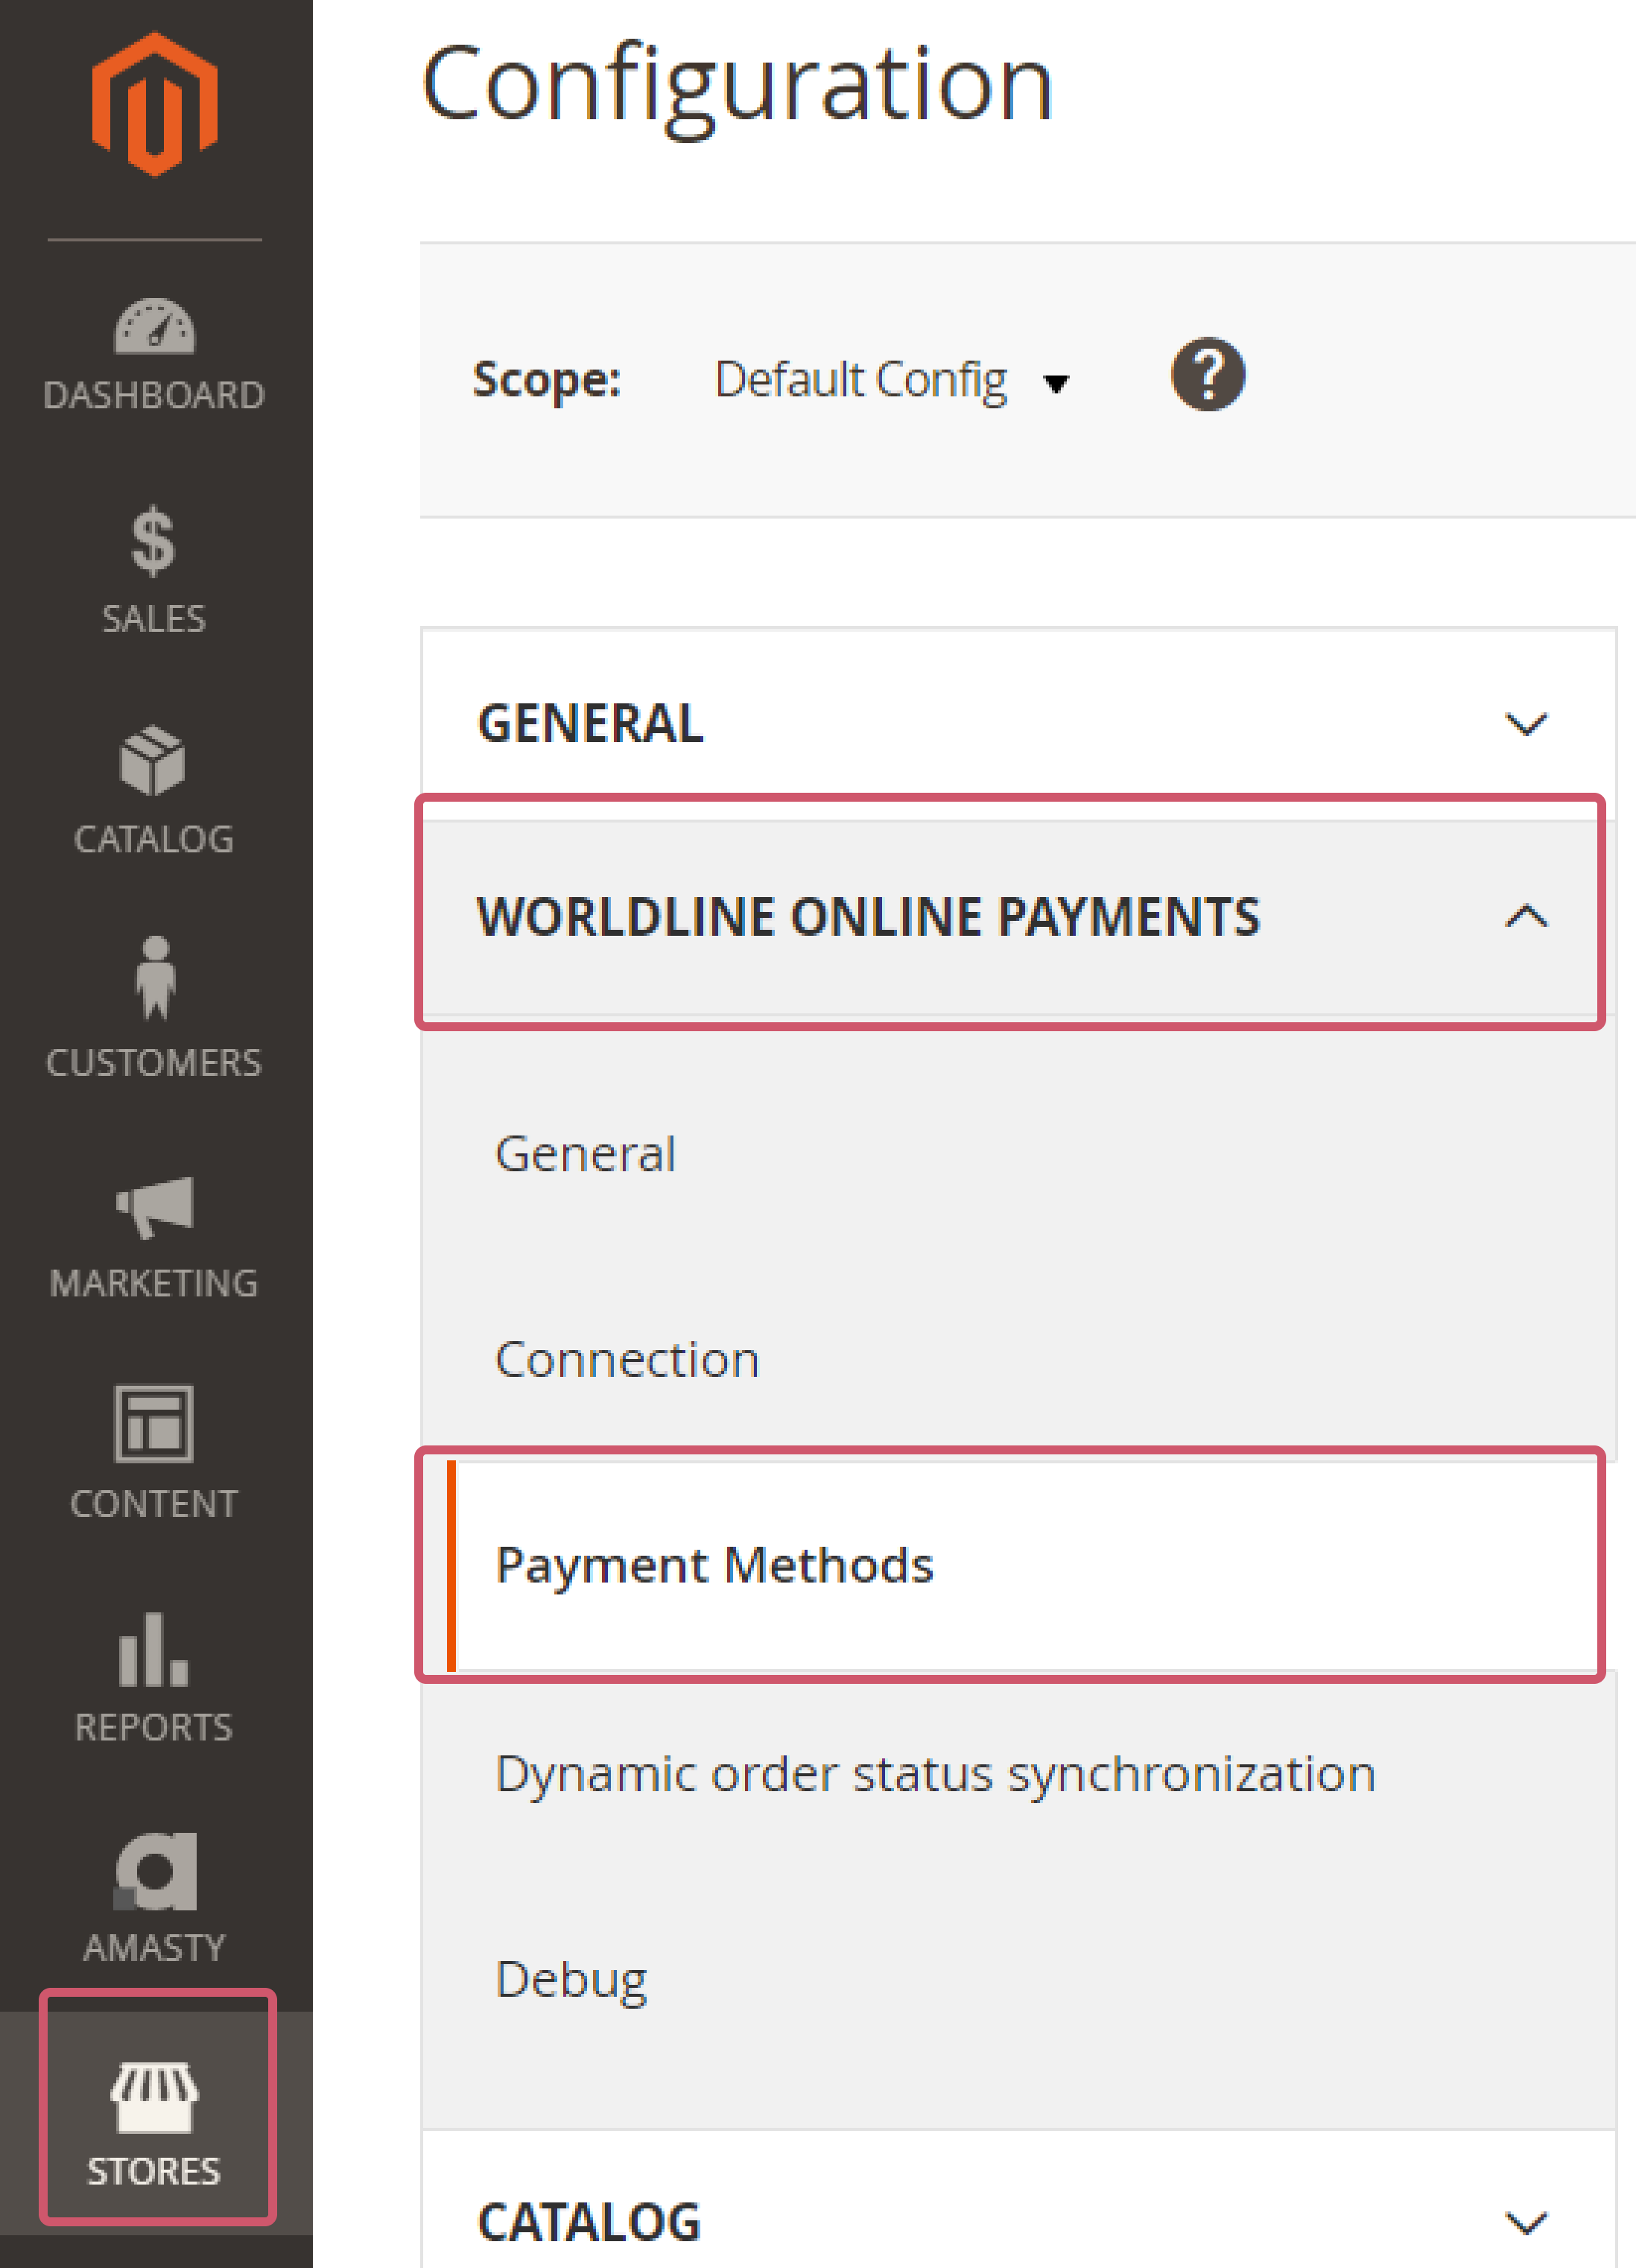
- Login to the Adobe commerce/Magento Back Office. Go to Stores > WORLDLINE ONLINE PAYMENTS > Payment methods.
- As the plugin supports Hosted Checkout Page (Hosted Checkout), Hosted Tokenization Page (Credit Card) and Single payment buttons (Redirect Payments), you can customise your customers’ payment experience by selecting payment methods for either mode and even use both flows together.
- Mind that card payments are available for both modes, whereas alternative payment methods are available only for Hosted Checkout Page and Single payment buttons.
- In "Credit Card", configure the following settings for transactions processed via our Hosted Tokenization Page
Property Description/Actions Enable Module Select one of the options for processing credit card payments
- "Yes": The module processes card payments via Hosted Tokenization Page integration mode. Any non-card payments go via Hosted Checkout Page as configured in "Hosted Checkout"
- "No": Instead of using Hosted Tokenization Page for card payments, all payment methods are offered via Hosted Checkout Page as configured in "Hosted Checkout"
Title Customise the payment button text in the iframe on the Magento checkout page HTML Template ID Enter the file name of your template to adapt our payment page to the look and feel of your shop. To learn how to create templates, see our dedicated chapters in the Hosted Tokenization Page guide Payment Action Define whether to process the transactions as authorisation mode or as direct sale. Select one of the following options:
- "Authorize & Capture": The amount has been ordered to be paid out in one go. Use this mode to receive the money before shipping the order There are no further actions required to capture the transaction. Successful transactions will have status="CAPTURED" / statusOutput.statusCategory="COMPLETED" / statusOutput.statusCode=9
- "Authorized (Authorization Only)": The amount is only blocked on your customer's card. Successful transactions will have status="PENDING_CAPTURE" / statusOutput.statusCategory="PENDING_MERCHANT" / statusOutput.statusCode=5 (Use this mode when you wish to capture a transaction only after shipping the order)
If "Payment Action" is set to "Authorized (Authorization Only)", beware of the following:
- Make sure that you capture authorised transaction later. Only then will the transaction have status="CAPTURED" / statusOutput.statusCategory="COMPLETED" / statusOutput.statusCode=9, for which you receive the actual payment for the transaction
- Capture transaction in the Magento Back Office via the "Order" module
Skip 3DSecure Authentication Select "Yes" or "No" to deactivate the 3-D Secure authentication process for payments
We strongly recommend selecting "No" as 3-D Secure is mandatory in some markets. This will also ensure liability shift for transactions with successful 3-D Secure authentication. If you select "Yes" and choose to process non 3-D Secure transactions you may not benefit from liability shift and may be held liable.
Trigger an authentication for every payment Select "Yes" if you want the issuer to request a SCA (strong customer authentication) for payments
Request 3DS exemption Some markets allow you to potentially exempt your customers from a 3-D Secure check.
Select "Yes" if you would like your customers to be potentially exempted. This applies only to transactions with a basket less than 30 EUR.
Sort Define the sort order of the iFrame. This allows you to decide in which order the different payment means are displayed on your checkout page
Filtering You can also implement various filters to define when to propose this way of processing payments to your customers: countries, currencies, amounts
- "Yes": The module processes card payments via Hosted Tokenization Page integration mode. Any non-card payments go via Hosted Checkout Page as configured in "Hosted Checkout"
- In "Hosted Checkout", configure the following settings for transactions processed via our Hosted Checkout Page
Property Description/Actions Enable Module Select one of the options to for processing all payments
- "Yes": The module processes both card and non-card payment methods via Hosted Checkout Page mode
- "No": The module processes only card payments via Hosted Tokenization Page integration mode
If you select "No", make sure "Enable Module" in the "Credit Card" module is set to "Yes" to ensure at least card payments are possible
Title Customise the heading on the Hosted Checkout Page HTML Template ID Enter the file name of your template to adapt our payment page to the look and feel of your shop. To learn how to create templates, see our dedicated chapters in the Hosted Checkout Page guide
Payment Action Define whether to process the transactions as authorisation mode or as direct sale. Select one of the following options:
- "Authorize & Capture": The amount has been ordered to be paid out in one go. Use this mode to receive the money before shipping the order There are no further actions required to capture the transaction. Successful transactions will have status="CAPTURED" / statusOutput.statusCategory="COMPLETED" / statusOutput.statusCode=9
- "Authorized (Authorization Only)": The amount is only blocked on your customer's card. Successful transactions will have status="PENDING_CAPTURE" / statusOutput.statusCategory="PENDING_MERCHANT" / statusOutput.statusCode=5 (Use this mode when you wish to capture a transaction only after shipping the order)
If "Payment Action" is set to "Authorized (Authorization Only)", beware of the following
- Make sure that you capture authorised transaction later. Only then will the transaction have status="CAPTURED" / statusOutput.statusCategory="COMPLETED" / statusOutput.statusCode=9, for which you receive the actual payment for the transaction
- Capture transaction in the Magento Back Office via the "Order" module
Skip 3DSecure Authentication Select "Yes" or "No" to deactivate the 3-D Secure authentication process for payments
We strongly recommend selecting "No" as 3-D Secure is mandatory in some markets. This will also ensure liability shift for transactions with successful 3-D Secure authentication. If you select "Yes" and choose to process non 3-D Secure transactions you may not benefit from liability shift and may be held liable.
Trigger an authentication for every payment Select "Yes" if you want the issuer to request a SCA (strong customer authentication) for payments
Request 3DS exemption Some markets allow you to potentially exempt your customers from a 3-D Secure check.
Select "Yes" if you would like your customers to be potentially exempted. This applies only to transactions with a basket less than 30 EUR.
Sort Define the sort order of the iFrame. This allows you to decide in which order the different payment means are displayed on your checkout page
Group Cards Group all cards payment methods under one single button on the Hosted Checkout Page
Submit Customer Cart Items Data to Worldline Defines whether you wish to submit your customer cart details to PAYONE E-Payment. Doing so will improve customer experience, but might generate errors in case you use custom tax rules
Filtering You can also implement various filters to define when to propose this way of processing payments to your customers: countries, currencies, amounts
- "Yes": The module processes both card and non-card payment methods via Hosted Checkout Page mode
For some properties, Magento allows you to use the default value defined on the system level. If you want to do this, flag “Use system value” accordingly.
- In "Redirect Payment", configure the following settings for transactions for which your customers preselect their preferred payment method before the redirection to our Hosted Checkout Page.
You can enable each payment method separately by configuring for each of them the following:Property Description/Actions Enable Module Select one of the options to for processing all payments
- "Yes": The module processes both card and non-card payment methods via Hosted Checkout Page mode.
- "No": The module processes only card payments via Hosted Tokenization Page integration mode.
If you select "No", make sure "Enable Module" in the "Credit Card" module is set to "Yes" to ensure at least card payment methods are possible.
Title Customise the heading on the Hosted Checkout Page.
HTML Template ID Enter the file name of your template to adapt our payment page to the look and feel of your shop. To learn how to create templates, see our dedicated chapters in the Hosted Checkout Page guide.
Payment Action Define whether to process the transactions as authorisation mode or as direct sale. Select one of the following options:
- "Authorize & Capture": The amount has been ordered to be paid out in one go. Use this mode to receive the money before shipping the order There are no further actions required to capture the transaction. Successful transactions will have status="CAPTURED" / statusOutput.statusCategory="COMPLETED" /statusOutput.statusCode=9
- "Authorized (Authorization Only)": The amount is only blocked on your customer's card. Successful transactions will have status="PENDING_CAPTURE" / statusOutput.statusCategory="PENDING_MERCHANT" /statusOutput.statusCode=5 (Use this mode when you wish to capture a transaction only after shipping the order).
If "Payment Action" is set to "Authorized (Authorization Only)", beware of the following:
- Make sure that you capture authorised transaction later. Only then will the transaction have status="CAPTURED" / statusOutput.statusCategory="COMPLETED" /statusOutput.statusCode=9, for which you receive the actual payment for the transaction.
- Capture transaction in the Magento Back Office via the "Order" module.
Skip 3DSecure Authentication Select "Yes" or "No" to deactivate the 3-D Secure authentication process for payments.
We strongly recommend selecting "No" as 3-D Secure is mandatory in some markets. This will also ensure liability shift for transactions with successful 3-D Secure authentication. If you select "Yes" and choose to process non 3-D Secure transactions you may not benefit from liability shift and may be held liable.
Trigger an authentication for every payment Select "Yes" if you want the issuer to request a SCA (strong customer authentication) for payments.
Request 3DS exemption Some markets allow you to potentially exempt your customers from a 3-D Secure check.
Select "Yes" if you would like your customers to be potentially exempted. This applies only to transactions with a basket less than 30 EUR.
Submit Customer Cart Items Data to Worldline Defines whether you wish to submit your customer cart details to PAYONE E-Payment. Doing so will improve customer experience, but might generate errors in case you use custom tax rules.
Sort Define the sort order of the iFrame. This allows you to decide in which order the different payment means are displayed on your checkout page
Property Description/Actions Enable Module Select one of the options to for processing all payments
- "Yes": The module processes both card and non-card payment methods via Hosted Tokenization Page mode.
- "No": The module processes only card payments via Hosted Checkout Page integration mode.
If you select "No", make sure "Enable Module" in the "Credit Card" module is set to "Yes" to ensure at least card payment methods are possible.
Sort Define the sort order of the iFrame. This allows you to decide in which order the different payment means are displayed on your checkout page.
Title Customise the heading on the Hosted Checkout Page.
- "Yes": The module processes both card and non-card payment methods via Hosted Checkout Page mode.
- Click on "Save Config" to confirm.
After the installation, you need to configure the plugin to link your store to our platform.
Configure connection
- Login to the Adobe commerce/Magento Back Office. Go to Stores > WORLDLINE ONLINE PAYMENTS > Connection.
- In Connection, configure the following settings:
Property Description/Actions Environment mode Select between "Test" or "Production" to link your shop to the respective environment. Depending on your selection, the shop module will send the transaction requests to the test or production environment.
Make sure to:
- Not to mix up credential from "Test" with Production" and vice versa when configuring fields Merchant ID (PSPID)/API Key/API Secret and webhooks credentials.
- To switch to "Production" as soon as you have finalised your tests.
API Key Enter the API Key of your test or live PSPID. Read our dedicated guide to learn how to generate one.
API Secret Enter the API Secret of your test or live PSPID. Read our dedicated guide to learn how to generate one.
Merchant ID (PSPID) Enter your PSPID from our platform that you want to use for transaction processing.
For some properties, Magento allows you to use the default value defined on the system level. If you want to do this, flag “Use system value” accordingly.
- Click on "Save Config" to confirm your configuration.
Once you have filled in the table, verify the configuration by establishing a test connection between the plugin and our platform. Click on the "Test Connection" button. Check that the button text changes to "Successful! Test again". If the button text changes to "Connection failed! Test again?", contact your system administrator for troubleshooting to check:
- You are using the correct credentials
- Whether your PSPID is active
- You send the request to the correct PSPID/environment (Test vs Production)
Configure webhooks
- Login to the Adobe commerce/Magento Back Office. Go to Stores > WORLDLINE ONLINE PAYMENTS > Connection.
- In Webhooks, configure the following settings:
Property Description/Actions Allow Receiving Webhooks Select "Yes" to receive webhooks in the Magento server. Webhook URL Copy this URL into the Endpoint URLs fields in the PAYONE E-Payment Merchant Portal as described in our dedicated guide. Key Enter the API key of your test or live PSPID. Read our dedicated guide to learn how to generate one. Secret Key Enter the API secret of your test or live PSPID. Read our dedicated guide to learn how to generate one.
For some properties, Magento allows you to use the default value defined on the system level. If you want to do this, flag "Use system value" accordingly.
- Click on "Save Config" to confirm and clean your cache.
Configure payment methods
- Login to the Adobe commerce/Magento Back Office. Go to Stores > WORLDLINE ONLINE PAYMENTS > Payment methods.
- As the plugin supports Hosted Checkout Page (Hosted Checkout), Hosted Tokenization Page (Credit Card) and Single payment buttons (Redirect Payments), you can customise your customers’ payment experience by selecting payment methods for either mode and even use both flows together.
- Mind that card payments are available for both modes, whereas alternative payment methods are available only for Hosted Checkout Page and Single payment buttons.
- In "Credit Card", configure the following settings for transactions processed via our Hosted Tokenization Page
Property Description/Actions Enable Module Select one of the options for processing credit card payments
- "Yes": The module processes card payments via Hosted Tokenization Page integration mode. Any non-card payments go via Hosted Checkout Page as configured in "Hosted Checkout"
- "No": Instead of using Hosted Tokenization Page for card payments, all payment methods are offered via Hosted Checkout Page as configured in "Hosted Checkout"
Title Customise the payment button text in the iframe on the Magento checkout page HTML Template ID Enter the file name of your template to adapt our payment page to the look and feel of your shop. To learn how to create templates, see our dedicated chapters in the Hosted Tokenization Page guide Payment Action Define whether to process the transactions as authorisation mode or as direct sale. Select one of the following options:
- "Authorize & Capture": The amount has been ordered to be paid out in one go. Use this mode to receive the money before shipping the order There are no further actions required to capture the transaction. Successful transactions will have status="CAPTURED" / statusOutput.statusCategory="COMPLETED" / statusOutput.statusCode=9
- "Authorized (Authorization Only)": The amount is only blocked on your customer's card. Successful transactions will have status="PENDING_CAPTURE" / statusOutput.statusCategory="PENDING_MERCHANT" / statusOutput.statusCode=5 (Use this mode when you wish to capture a transaction only after shipping the order)
If "Payment Action" is set to "Authorized (Authorization Only)", beware of the following:
- Make sure that you capture authorised transaction later. Only then will the transaction have status="CAPTURED" / statusOutput.statusCategory="COMPLETED" / statusOutput.statusCode=9, for which you receive the actual payment for the transaction
- Capture transaction in the Magento Back Office via the "Order" module
Skip 3DSecure Authentication Select "Yes" or "No" to deactivate the 3-D Secure authentication process for payments
We strongly recommend selecting "No" as 3-D Secure is mandatory in some markets. This will also ensure liability shift for transactions with successful 3-D Secure authentication. If you select "Yes" and choose to process non 3-D Secure transactions you may not benefit from liability shift and may be held liable.
Trigger an authentication for every payment Select "Yes" if you want the issuer to request a SCA (strong customer authentication) for payments
Request 3DS exemption Some markets allow you to potentially exempt your customers from a 3-D Secure check.
Select "Yes" if you would like your customers to be potentially exempted. This applies only to transactions with a basket less than 30 EUR.
Sort Define the sort order of the iFrame. This allows you to decide in which order the different payment means are displayed on your checkout page
Filtering You can also implement various filters to define when to propose this way of processing payments to your customers: countries, currencies, amounts
- "Yes": The module processes card payments via Hosted Tokenization Page integration mode. Any non-card payments go via Hosted Checkout Page as configured in "Hosted Checkout"
- In "Hosted Checkout", configure the following settings for transactions processed via our Hosted Checkout Page
Property Description/Actions Enable Module Select one of the options to for processing all payments
- "Yes": The module processes both card and non-card payment methods via Hosted Checkout Page mode
- "No": The module processes only card payments via Hosted Tokenization Page integration mode
If you select "No", make sure "Enable Module" in the "Credit Card" module is set to "Yes" to ensure at least card payments are possible
Title Customise the heading on the Hosted Checkout Page HTML Template ID Enter the file name of your template to adapt our payment page to the look and feel of your shop. To learn how to create templates, see our dedicated chapters in the Hosted Checkout Page guide
Payment Action Define whether to process the transactions as authorisation mode or as direct sale. Select one of the following options:
- "Authorize & Capture": The amount has been ordered to be paid out in one go. Use this mode to receive the money before shipping the order There are no further actions required to capture the transaction. Successful transactions will have status="CAPTURED" / statusOutput.statusCategory="COMPLETED" / statusOutput.statusCode=9
- "Authorized (Authorization Only)": The amount is only blocked on your customer's card. Successful transactions will have status="PENDING_CAPTURE" / statusOutput.statusCategory="PENDING_MERCHANT" / statusOutput.statusCode=5 (Use this mode when you wish to capture a transaction only after shipping the order)
If "Payment Action" is set to "Authorized (Authorization Only)", beware of the following
- Make sure that you capture authorised transaction later. Only then will the transaction have status="CAPTURED" / statusOutput.statusCategory="COMPLETED" / statusOutput.statusCode=9, for which you receive the actual payment for the transaction
- Capture transaction in the Magento Back Office via the "Order" module
Skip 3DSecure Authentication Select "Yes" or "No" to deactivate the 3-D Secure authentication process for payments
We strongly recommend selecting "No" as 3-D Secure is mandatory in some markets. This will also ensure liability shift for transactions with successful 3-D Secure authentication. If you select "Yes" and choose to process non 3-D Secure transactions you may not benefit from liability shift and may be held liable.
Trigger an authentication for every payment Select "Yes" if you want the issuer to request a SCA (strong customer authentication) for payments
Request 3DS exemption Some markets allow you to potentially exempt your customers from a 3-D Secure check.
Select "Yes" if you would like your customers to be potentially exempted. This applies only to transactions with a basket less than 30 EUR.
Sort Define the sort order of the iFrame. This allows you to decide in which order the different payment means are displayed on your checkout page
Group Cards Group all cards payment methods under one single button on the Hosted Checkout Page
Submit Customer Cart Items Data to Worldline Defines whether you wish to submit your customer cart details to PAYONE E-Payment. Doing so will improve customer experience, but might generate errors in case you use custom tax rules
Filtering You can also implement various filters to define when to propose this way of processing payments to your customers: countries, currencies, amounts
- "Yes": The module processes both card and non-card payment methods via Hosted Checkout Page mode
For some properties, Magento allows you to use the default value defined on the system level. If you want to do this, flag “Use system value” accordingly.
- In "Redirect Payment", configure the following settings for transactions for which your customers preselect their preferred payment method before the redirection to our Hosted Checkout Page.
You can enable each payment method separately by configuring for each of them the following:Property Description/Actions Enable Module Select one of the options to for processing all payments
- "Yes": The module processes both card and non-card payment methods via Hosted Checkout Page mode.
- "No": The module processes only card payments via Hosted Tokenization Page integration mode.
If you select "No", make sure "Enable Module" in the "Credit Card" module is set to "Yes" to ensure at least card payment methods are possible.
Title Customise the heading on the Hosted Checkout Page.
HTML Template ID Enter the file name of your template to adapt our payment page to the look and feel of your shop. To learn how to create templates, see our dedicated chapters in the Hosted Checkout Page guide.
Payment Action Define whether to process the transactions as authorisation mode or as direct sale. Select one of the following options:
- "Authorize & Capture": The amount has been ordered to be paid out in one go. Use this mode to receive the money before shipping the order There are no further actions required to capture the transaction. Successful transactions will have status="CAPTURED" / statusOutput.statusCategory="COMPLETED" /statusOutput.statusCode=9
- "Authorized (Authorization Only)": The amount is only blocked on your customer's card. Successful transactions will have status="PENDING_CAPTURE" / statusOutput.statusCategory="PENDING_MERCHANT" /statusOutput.statusCode=5 (Use this mode when you wish to capture a transaction only after shipping the order).
If "Payment Action" is set to "Authorized (Authorization Only)", beware of the following:
- Make sure that you capture authorised transaction later. Only then will the transaction have status="CAPTURED" / statusOutput.statusCategory="COMPLETED" /statusOutput.statusCode=9, for which you receive the actual payment for the transaction.
- Capture transaction in the Magento Back Office via the "Order" module.
Skip 3DSecure Authentication Select "Yes" or "No" to deactivate the 3-D Secure authentication process for payments.
We strongly recommend selecting "No" as 3-D Secure is mandatory in some markets. This will also ensure liability shift for transactions with successful 3-D Secure authentication. If you select "Yes" and choose to process non 3-D Secure transactions you may not benefit from liability shift and may be held liable.
Trigger an authentication for every payment Select "Yes" if you want the issuer to request a SCA (strong customer authentication) for payments.
Request 3DS exemption Some markets allow you to potentially exempt your customers from a 3-D Secure check.
Select "Yes" if you would like your customers to be potentially exempted. This applies only to transactions with a basket less than 30 EUR.
Submit Customer Cart Items Data to Worldline Defines whether you wish to submit your customer cart details to PAYONE E-Payment. Doing so will improve customer experience, but might generate errors in case you use custom tax rules.
Sort Define the sort order of the iFrame. This allows you to decide in which order the different payment means are displayed on your checkout page
Property Description/Actions Enable Module Select one of the options to for processing all payments
- "Yes": The module processes both card and non-card payment methods via Hosted Tokenization Page mode.
- "No": The module processes only card payments via Hosted Checkout Page integration mode.
If you select "No", make sure "Enable Module" in the "Credit Card" module is set to "Yes" to ensure at least card payment methods are possible.
Sort Define the sort order of the iFrame. This allows you to decide in which order the different payment means are displayed on your checkout page.
Title Customise the heading on the Hosted Checkout Page.
- "Yes": The module processes both card and non-card payment methods via Hosted Checkout Page mode.
- Click on "Save Config" to confirm.